How to install and configure PSI chat client for Openfire Server | Free VPS

7:43:00 AM 1

Openfire is a powerful instant messaging (IM) and chat server that implements the XMPP protocol.
To connect to Openfire you need to download �PSI� client software or any other chat clients like spark, pidgin, etc.. and install in your system.

You can install and configure it in your own style. Here I am using PSI chat client, the advantage of  which is that we can add more options.

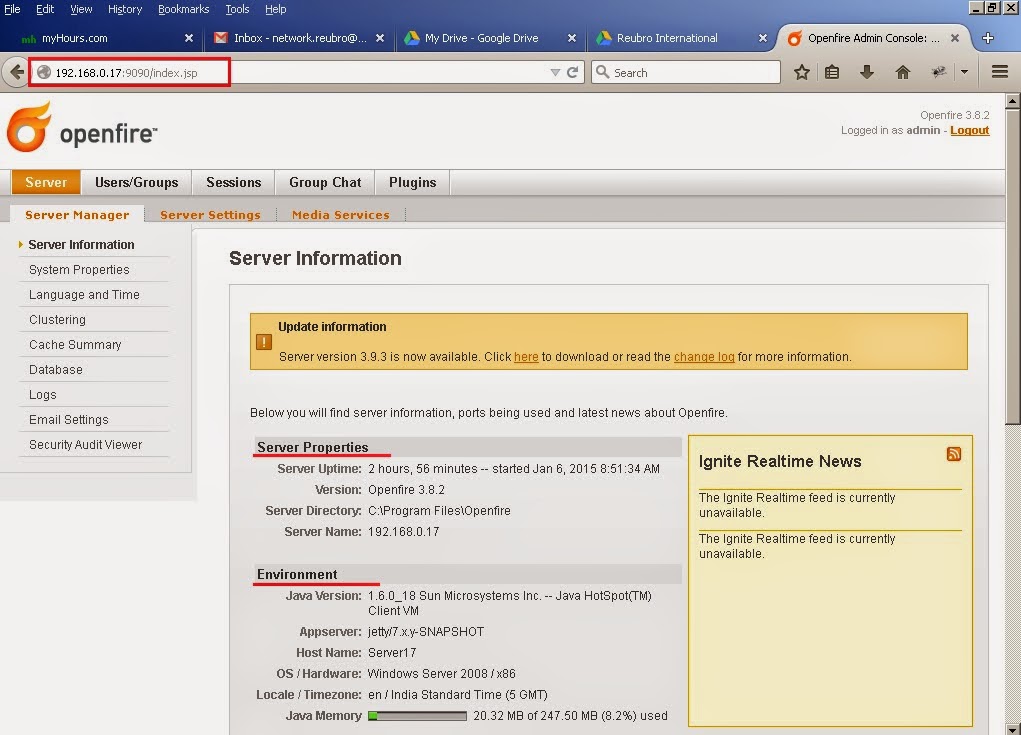
Step 1 - Log in to openfire chat server check the server details.
 

Step 2 - Now we need to create a user account. Go to User/Group => Create New User and Enter the user details.


Step 3 - I have already installed PSI chat client in my PC. You can use the below mentioned url to see the installation guideline.

http://itinformation-shyam.blogspot.in/2015/01/psi-chat-client-installing-on-windows.html

Step 4 - After installation, open PSI chat client in your client PC.

Note : Here, select Profile as "Default" for adding registered user account in PSI.


Step 5 - Add registered user account already created in openfire server. This option is to be done only for first time. Go to General => Account Setup =>Add


Note :  We can also Register new User Account in openfire server by selecting "Register new account" in 'PSI Add Account' window.

In Next  window, Jabber ID will be : Username @ Server IP.

Step 6 - Then, we can see the added account in Jabber Account list as shown below:

Step 7 - Now login with  the user account in PSI. At the time of time login, accept the certificate and publish.


Step 8 - Send friend request to all users in the server.

Note  : In PSI, we can send friend request to all users in a single click.


Step 9 - Now login is completed successfully and  chat with friends.

That's it.....

PSI chat client installing on windows PC | Free VPS

9:53:00 AM 1

Psi is a free instant messaging application designed for the XMPP network (including Google Talk). Fast and lightweight, Psi is fully open-source and compatible with Windows, Linux, and Mac OS X. To connect to Openfire you need to download �PSI� client software and install on your system.

Step 1 - Download PSI chat client from Internet.

Step 2 - Install PSI client from downloaded folder.


 Step 3 - Next,  you can see welcome wizard scree, Click Next.

 Step 4 - Agree the license agreement, Click I Agree

 Step 5 - Choose the PSI components, Click Next

 Step 6 - Choose the installation location, Click Install

Step 7 - Installation completed, we can run the program now. Click Finish

Step 8 - Open PSI, select profile as "Default" then click Open.


Here we can Create/Register a User Account.

That's it...
How to Setup Vsftpd server and Point the Home Directory manually | Free VPS

How to Setup Vsftpd server and Point the Home Directory manually | Free VPS

8:02:00 AM 0

FTP is used to transfer files from one host to another over TCP network. There are 3 popular FTP server packages available PureFTPD, VsFTPD and ProFTPD. 

If you are login as a normal user, you have to use "sudo" before the command, only for the first time. If your in root login, you can simply use the command, without "sudo".

Step 1 � Update your repositories.
     root@digidom:~# apt-get update

Step 2 � Install VsFTPD package using the below command.
     root@digidom:~# apt-get install vsftpd

Step 3 � Check the vsftpd directories and file paths.
     root@digidom:~# whereis vsftpd


     vsftpd: /usr/sbin/vsftpd /etc/vsftpd.conf /usr/share/man/man8/vsftpd.8.gz


Step 4 � Backup the /etc/vsftpd.con file


     root@digidom:~# cp /etc/vsftpd.conf /etc/vsftpd.conf.back


Step 5 � After installation open /etc/vsftpd.conf file and make changes as follows.

     root@digidom:~# vi /etc/vsftpd.conf
     root@digidom:~# egrep -v '^#|^$' /etc/vsftpd.conf
     listen=YES
     anonymous_enable=NO
     local_enable=YES
     write_enable=YES
     dirmessage_enable=YES
     use_localtime=YES
     xferlog_enable=YES
     chroot_local_user=YES
     allow_writeable_chroot=YES
     connect_from_port_20=YES
     secure_chroot_dir=/var/run/vsftpd/empty
     pam_service_name=vsftpd
     rsa_cert_file=/etc/ssl/certs/ssl-cert-snakeoil.pem
     rsa_private_key_file=/etc/ssl/private/ssl-cert-snakeoil.key

Step 6 � Restart vsftpd service using the below command.
     root@digidom:~# service vsftpd restart


Step 7 � Create a User account with nologin shell and specify Home Directory location, I point to "/var/www/html/" and set the password. You can specify your own path.

Note : Do not delete this account using "userdel -rf mailftp". It will remove html directory, because this user (mailftp) home directory is /var/www/html/. 


  root@digidom:~# useradd -m -d /var/www/html/ -s /usr/sbin/nologin mailftp

  root@digidom:~# passwd mailftp

Options 1  If you have any doubt in nologin shell, check the login shell.
     root@digidom:~# cat /etc/shells
          # /etc/shells: valid login shells
          /bin/sh
          /bin/dash
          /bin/bash
          /bin/rbash
          /usr/bin/tmux
          /usr/bin/screen
          /usr/sbin/nologin

If not there /usr/sbin/nologin just add for using this command.

     root@digidom:~# echo "/usr/sbin/nologin" >> /etc/shells

Step 8 � Check the user accounts details
     root@digidom:~# tail /etc/passwd | grep mailftp
          mailftp:x:1001:1001::/var/www/html/:/usr/sbin/nologin

Step 9 � Set the permission.


     root@digidom:~# chown mailftp:root /var/www/html/
     root@digidom:~# ll -d /var/www/html/
          drwxr-xr-x  5 mailftp root 4096 Dec 16 22:55 html/

                                  OR


     root@digidom:~# chown root:mailftp /var/www/html/
     root@digidom:~# chmod -R 775 /var/www/html/
     root@digidom:~# ll -d /var/www/html/
          drwxrwxr-x  5 root mailftp 4096 Dec 16 22:55 html/
     
     root@digidom:~# service vsftpd restart

Step 10 � If another option is create a directory inside of html user home directory point this.


    root@digidom:~# useradd -m -d /var/www/html/ftp -s /usr/sbin/nologin mailftp

    root@digidom:~# passwd mailftp

    root@digidom:~# chown mailftp:mailftp /var/www/html/ftp
    root@digidom:~# ll -d /var/www/html/ftp
          drwxr-xr-x  5 mailftp mailftp 4096 Dec 16 22:55 ftp/

    root@digidom:~# service vsftpd restart

That's it............

How to install XAMPP on windows 7 | Free VPS

8:01:00 AM 0

XAMPP stands for Cross-Platform (X), Apache (A), MySQL (M), PHP (P) and Perl (P). It is a simple, lightweight Apache distribution that makes it extremely easy for developers to create a local web server for testing purposes. Everything you need to set up a web server � server application (Apache), database (MySQL), and scripting language (PHP) � is included in a simple extractable file. XAMPP is also cross-platform, which means it works equally well on Linux, Mac and Windows. 


Step 1 - Download XAMPP setup from website:


Step 2 - Disable your anti-virus as it can cause some XAMPP components to behave erratically.

Step 3 - Start the installation process by double-clicking on the XAMPP installer.


Step 4 - For Windows 7 users, you will see a window pop up, warning you about User Account Control (UAC) being active on your system. Click OK to continue the installation.


Step 5 - Next you will see the Welcome to the XAMPP setup wizard screen. Click Next to continue the installation.


Step 6 - Choose the folder you want to install XAMPP. This folder will hold all your web application files, so make sure to select a drive that has plenty of space.


Step 7 - The next screen is a promo for BitNami, an app store for server software. Deselect the �Learn more about BitNami for XAMPP� checkbox, unless you actually enjoy receiving promo mails.


Step 8 - Setup is now ready to install XAMPP. Click Next and wait for the installer to unpack and install selected components. This may take a few minutes.


Step 9 - Installation is now complete! Select the �Do you want to start the Control Panel now?� checkbox to open the XAMPP control panel.


Step 10 - The XAMPP control panel gives you complete control over all installed XAMPP components and tart the apache and mysql.


Step 11 - Test the XAMPP, open your web browser and type in: http://localhost or 127.0.0.1. Select your language from the splash screen.


You should see the following screen. This means you�ve successfully installed XAMPP on your computer.

Step 12 - We will now test whether XAMPP has installed PHP successfully. Open Notepad and type the following into a new document:

     <?php
       phpinfo();
     ?>

Save this file as �test.php� in c:\xampp\htdocs\ (or whichever directory you installed XAMPP in).
Navigate to http://localhost/phpinfo.php. You should see the �Hello World� message


Step 13 - You can access phpMyAdmin by entering http://localhost/phpmyadmin in your web browser.


That's it.....