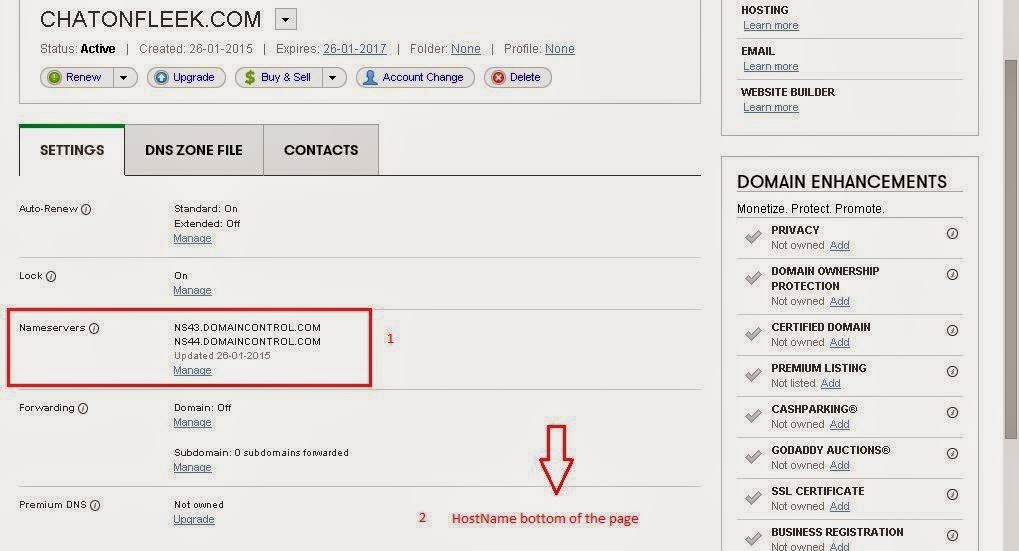
Step 2 - Go to My Account Section, we can see our purchased product. Then select Domain Name => Manage.
Here, select which Domain you want to check and modify. Go to Setting => Check Domain details for NameServer and Hostname.

Step 4 - Go to VPS server Control Panel/WHM and check the NameServer details.
Go to DNS Functions => NS Record Report. Here, we can see the default NameServer & IP.
Note : In this case, I am configuring NameServer globally on this server.
Step 5 - Now we need to create new Cpanel account on this server, then only we can globally configure NS on this server.
Go to WHM => Account Functions => Create a New Account.
Here, fill the information about Domain details for the cpanel account => Create
Step 6 - Now check the Cpanel account is created or not in WHM. Account Information => List account.
Here, we can see the new account is created. This account is automatically created in DNS zone file under DNS Functions.
Step 7 - Go to DNS Setting for changing or creating own Nameserver on this server. DNS Fuctions => Edit Zone => Here we can see the created domain name => Select the Domain name.
Here we can see the DNS Zone file information. We have to modify the details for changing SOA , NS1 NS2 and Add A record and save.
Step 8 - Now we added our Nameserver and A record on DNS zone file. We need to assign the NameServer and IP to make it globally. Go to Server Configuration => Basic Cpanel & WHM Setup.
Here, select "All" option and go to bottom of the page and assign the NamesServer and IP address.
1st Check /etc/wwwacct.conf => NameServer is added correctly or not.
2nd Check the /var/cpanel/nameserverips.yaml => Sometimes the nameserver will not be added automatically, then we need to manually change this Nameserver and IP.
DNS Functions => NS Record Report. Here we can see the Nameserver and IP
Step 11 - Next, go to Domain control panel and Domain settings.
1st change the host name. In bottom of the page, select Host Name => Manage => Add Host name => Save
2nd Change Nameserver => Go to Name Server => Manage => Select Custom => Add NameServer (NS1 NS2) => Save
Here, We can go for default configuration by selecting "standard" option.
Note : Domain Name Pointing will take propagation time of 72hrs/48hrs. Sometimes it may take only 2hrs/4hrs.
Step 12 - We can check the Domain Name changed or not in online using this site http://www.kloth.net/.
In this option, we can identify the domain hosted web server.
Go to browser =>Type your domain name (chatonfleek.com)
That's it.....


EmoticonEmoticon